Networking Basics - Certifications - Windows 7 - Windows 8 - Home Network Setup - Wireless Setup :: About - Contact - Search
Windows 7 Password Protected File Sharing
Use password protected file sharing in Windows 7 always! It ensures that users authenticate with an authorized username and password when accessing your shared files. You don't want just anyone to have access to your shared files so I will show you how to protect them.
|
1.) Go to Start > Control Panel |
 |
|
2.) The Control Panel opens, click View network status and tasks. |
 |
3.) The Network and Sharing Center window opens.
Before enabling file sharing, make sure the right network location type is selected.
I am using network location type of home network for this tutorial.

4.) Click Change advance sharing settings

5.) The Advanced sharing settings window appear, make sure that Network Discovery and File and printer sharing are both set to "ON" under your profile (ex: home or work).
NOTE: To ease this tutorial, I suggest you make sure that you set all computers to the same workgroup.

6.) Finally, scroll down and Turn on password protected sharing.

7.) Now let's proceed with this password protected file sharing tutorial and share a file or folder.
Locate the file or folder you want to share and right click the file or folder.

8.) A new window called File Sharing opens, you can now type the name of the user you want to share the file or folder with or choose one in the list. I typed "Kaelyn" and choose permissions of Read/Write.
Click Share
NOTE: Read - Allows you to open but not modify or delete the file.
Read/Write - Allows you to open, modify, or delete the file.

9.) The next window confirms that you have successfully shared the folder with Kaelyn.

10.) Now the user Kaelyn can access the password protected folder from any Windows operating system. Here we are trying to access the folder and are prompted for an authorized username and password.
Type in the user you allowed access earlier, in my case I typed Kaelyn and the correct password.
I now have access to that folder.

Please Note: The shared folder does not have an icon showing that it is shared. You can verify that it is shared by clicking it once and reading the information at the bottom of the opened window or right clicking the folder and choosing properties.

|
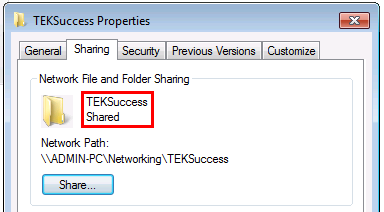
11.) Click the Sharing tab and you can see that the folder is shared and it also shows the network path. |
 |
12.) If you select the Security tab, you can add or remove any user or group that you want to share the folder or file with. When you select a user or group, you can now change the permissions that they will have for accessing this folder.

Hope this tutorial on password protected file sharing helped you out.....
Click here to return to the Windows 7 wireless setup...
Return from Password Protected File Sharing in Windows 7 to Windows 7 Networking Tips
Return from Password Protected File Sharing in Windows 7 to homepage of Computer Networking Success
"Didn't find what you were looking for? Use this search feature to find it."

1
Did You Like This Page?
Share This Page

Laptop Repair Video Course Click Below!


 |
 |
 |
 |
 |
Networking Basics - Certifications - Windows 7 - Windows 8 - Home Network Setup - Wireless Setup :: About - Contact - Search
Copyright © 2013 Computer-Networking-Success.com
New! Comments
Have your say about what you just read! Leave a comment in the box below.