Networking Basics - Certifications - Windows 7 - Windows 8 - Home Network Setup - Wireless Setup :: About - Contact - Search
What is a Homegroup in Windows 7?
A homegroup in Windows 7 makes it even easier to share documents, photos, music and other files with other computers at home or office.
So what is a homegroup? It's a collection of PCs that share pictures, music, videos, printers and documents. In order for a a computer to participate in a homegroup, the computer must be running Windows 7.
You decide which files or folders to share in your homegroup. Other people can't change the files you share unless you give them permission. You can also protect your homegroup with a password, which you can change at any time.
Read my article about the difference between Homegroups, workgroups ad domains to learn when to use them.
All editions of Windows 7 allow you to create a homegroup except in the Home Basic and Starter editions. In those editions, you can only join a homegroup.
Computer that are already on a domain can join a homegroup but they can't share files. This is usually because the domain controls the permissions and security on that computer.
First let's make sure you join a HomeGroup before sharing a file or folder....
|
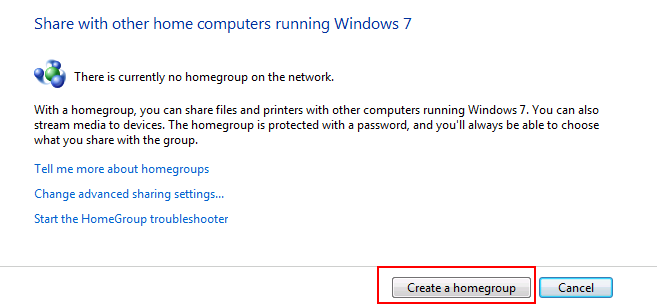
Go to Start > Control Panel > View network status and tasks > Next to Homegroup - click Ready to Create The HomeGroup wizard starts, click Create a homegroup |
  |
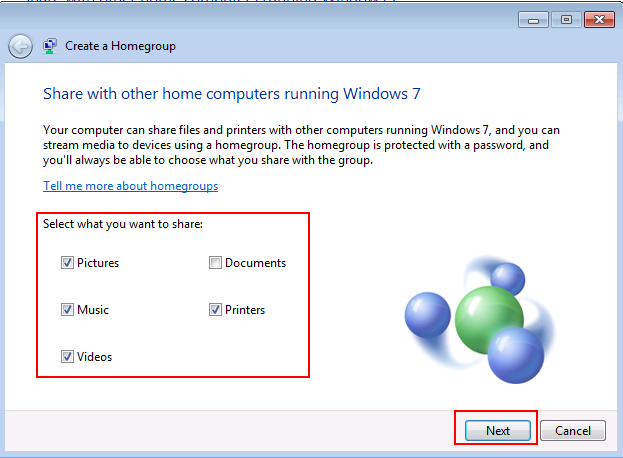
Now choose what you want to share with the homegroup.
Click Next
In the next screen, a password is created for you to use when adding other computers to your homegroup. Save this password. You will need to type it once when you first join the homegroup on your other computers.
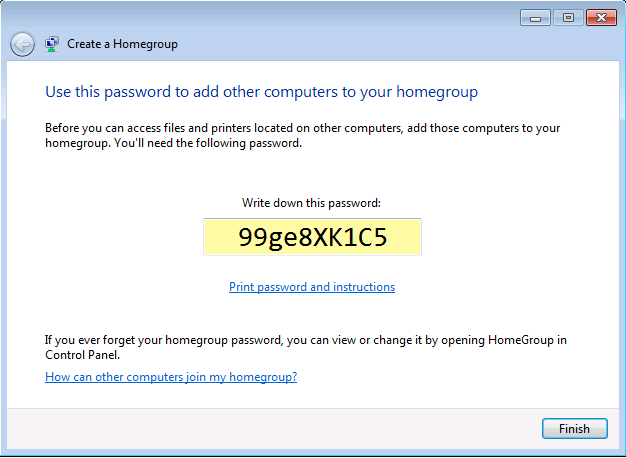
You have now created a homegroup in Windows 7...
Let's begin and share a folder using the Share With menu....
NOTE: If you don't see the Share with menu, you might be trying to share an item on a network or other unsupported location. It also won't appear when you select files outside your personal folder.
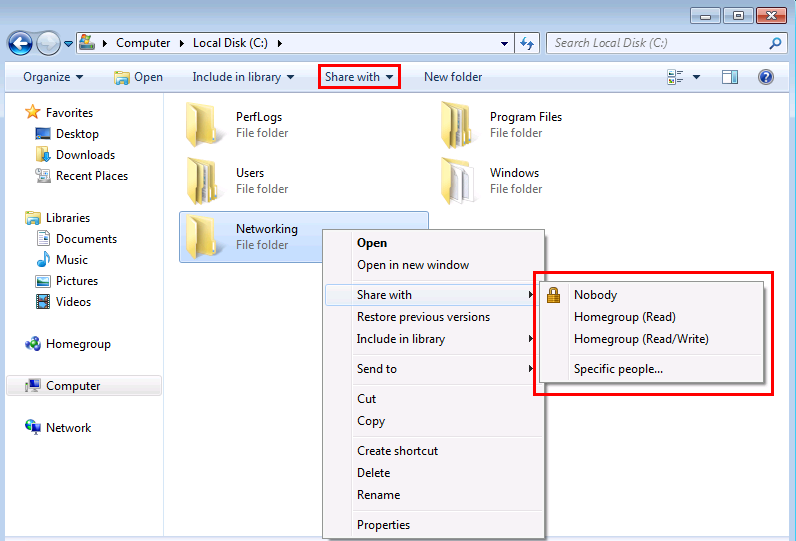
1.) Right-click the folder you want to share and select Share with. (There is also a Share with drop down window at the top of the menu bar)
You can choose one of the following options:
Homegroup (Read). This options shares the item with your entire homegroup—but only to open the item. Homegroup members can't modify or delete the item.
Homegroup (Read/Write). This option shares the item with your entire homegroup to open, modify, or delete the item.
Specific people. This option opens the File Sharing wizard, which allows you to select individual people to share items with.
2.) In this tutorial I will click Specific people...
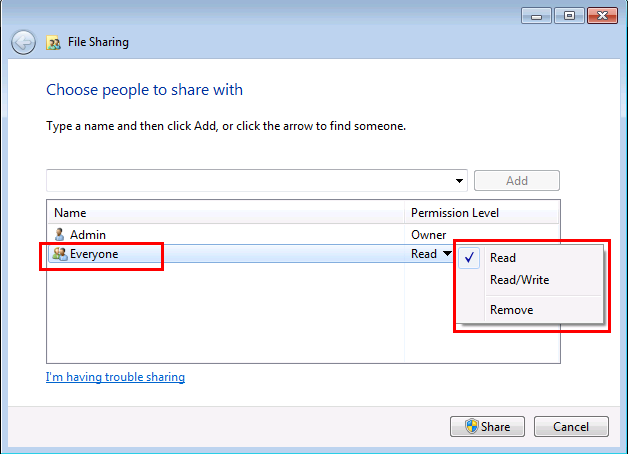
3.) The File Sharing wizard opens, type in the name of the user or group that you want to share the folder with.
I want to add the Everyone group. After typing the user or group name, Click Add
You can select the permission allowed to this user. Select Read only.
Read - Can open a folder or file but not can't modify or delete the file.
Read/Write - Can open, modify, or delete the file.
4.) When you are finished adding people then click Share. (If you are prompted for an administrator password or confirmation, type the password or provide confirmation. )
5.) In the next window, it is confirmed that your folder is shared. To let people know how to access the folder you can click e-mail to send someone a link to your shared folder or you can click copy to automatically copy the link to the Windows Clipboard. You can now paste it into your e-mail message, instant message or any other program.
Click Done
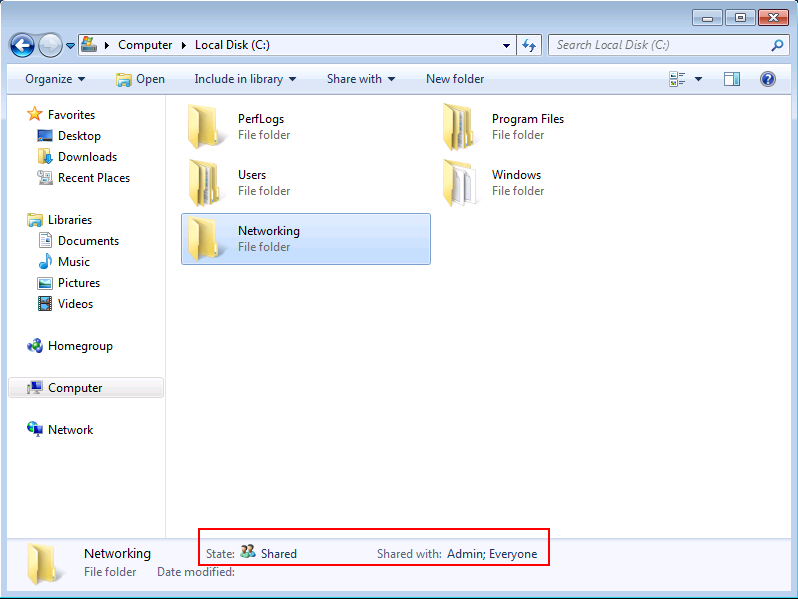
It's easy to tell what's shared and what's not by looking at the details pane in Windows Explorer. (To open Windows Explorer, click the Start button , and then click your user name.)
Just click the file or folder that you shared. The details pane at the bottom of the window will show you whether it's shared and who it's shared with.
Now you see how handy this new feature of homegroup in Windows 7 is....
Return from HomeGroup in Windows 7 to Windows 7 Networking Tips
Return from HomeGroup in Windows 7 to homepage of Computer Networking Success
Have any questions regarding this tutorial on Homegroups??? Please comment below for more help or contact me
"Didn't find what you were looking for? Use this search feature to find it."

1


New! Comments
Have your say about what you just read! Leave a comment in the box below.