Networking Basics - Certifications - Windows 7 - Windows 8 - Home Network Setup - Wireless Setup :: About - Contact - Search
How to Set Up an Ad Hoc Network in Windows XP
This tutorial will show you how to set up an ad hoc network in Windows XP. If you don't have a router or access point in your home, then you can configure Windows XP with an ad hoc connection and share your
Internet connection wirelessly. You can also use an ad hoc connection to share your files and printers.
If your in search for a new wireless router, I recommend this one from Amazon.comLet's first start by enabling Internet Connection Sharing (ICS) on the host computer.
Enable Internet Connection Sharing on Windows XP
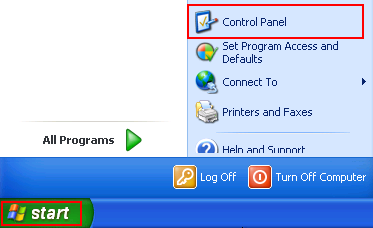
1.) Click Start in the bottom left corner of the taskbar, click Control Panel
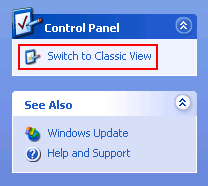
2.) In the new window that opens, Click Switch to Classic View to continue this tutorial.
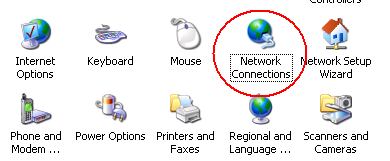
3.) Double-click Network Connections.
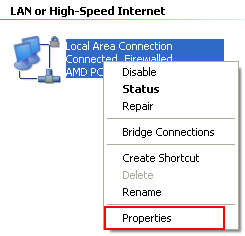
4.) Right-click the Ethernet network connection that your DSL or Cable modem is connected to and click Properties.
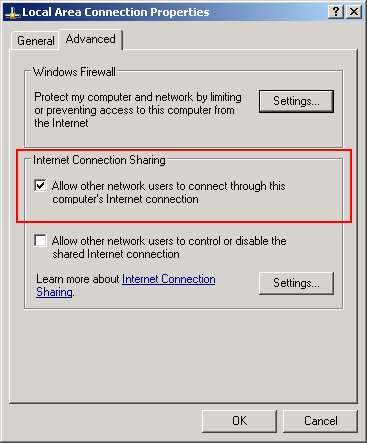
5.) Click the Advance tab, select the Allow other network users to connect through this computer's Internet connection check box.
Make sure the Allow other network users to control or disable the shared Internet connection is not checked to ensure your computer is in control of ICS.
Click OK
OK, Now we can create the Ad Hoc wireless network in the host computer......
Set Up an Ad Hoc Network in Windows XP
This ad hoc wireless network that you will create will allow other computers in your network to connect wirelessly to this computer and share the Internet along with your files and printers.
1.) Click Start in the bottom left corner of the taskbar, click Control Panel

2.) Make sure you Click Switch to Classic View on the top left corner in the new window that opens. This will ensure that this tutorial is accurate as you follow along.

3.) Double-click Network Connections.

4.) Right-Click Wireless Network Connection and click Properties
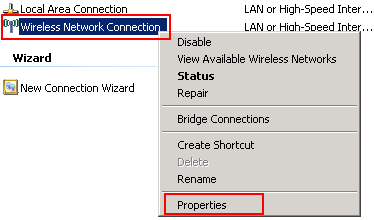
5.) The Wireles Network Connection Properties window opens
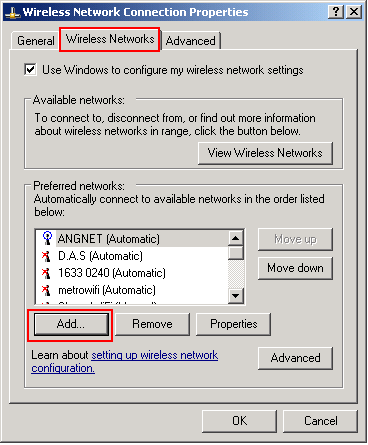
Click the Wireless Networks tab and click Add
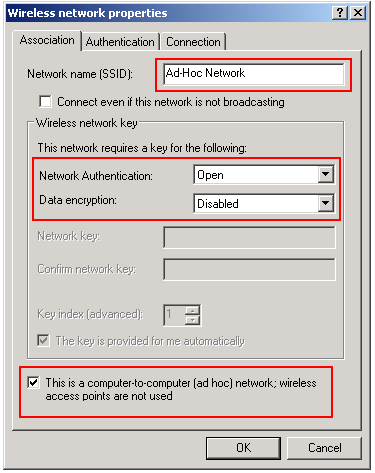
6.) Under the Association tab, next to Network name (SSID) type in the new ad hoc network name.
I named mine "Ad-Hoc Network"
- Next to Network Authentication: you can choose between "Open" and "Shared". Leave it at Open
- Next to Data encryption: you can choose between "Disabled" and "WEP". For now we will leave it at Disabled to ensure we can connect the other computers and verify a successful ad hoc configuration.
After you verify a working connection, we can choose WEP and next to Network key: we can type the WEP key.
The WEP key should be a random sequence of hexadecimal digits or numbers, letters and punctuation.
Please note that WEP is not so secure but it is the only option you can choose to ensure encryption is used.
- Select the This is a computer-to-computer (ad hoc) network; wireless access points are not used check box.
- Click OK
If you choose Disabled next to Data encryption, a window pops up warning you that; information sent over the network can be visible by other people when not using encryption, click Continue Anyway.
When you configure the ad hoc connection with WEP, then you have to make sure all the computers that will connect to this ad hoc use the configured encryption WEP key.
This computer will now broadcast a wireless signal that specifies it is an Ad Hoc Network connection. Any computer in range can connect if they have a wireless adapter.
When they connect, they will be prompted for the WEP key. Once the WEP key is verified, both computers will share files and printers along with the Internet connection.
You have now configured the host computer, let's move on to configuring the client computers...
How to connect your other computers to the Ad Hoc Network
Your other computers must have a wireless network adapter in order to see the Ad hoc connection and connect to it.
Also make sure that your computers are set to "Obtain an IP address automatically" if you will be sharing your Internet. Click here for a quick tutorial.
Remember that you will use the ad hoc connection to share your Internet, files and printers. If you have a wireless access point or router then I recommend you use that instead of an ad hoc connection. A wireless router will allow more computers way faster speed and range along with security.
1.) Click Start, click Control Panel and Double-click Network Connections.

2.) Right-click Wireless Network Connection and click View Available Wireless Networks
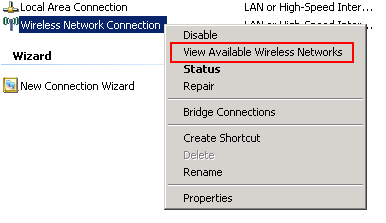
3.) The Wireless Network Connection window opens, select your new Ad-Hoc Network and click Connect
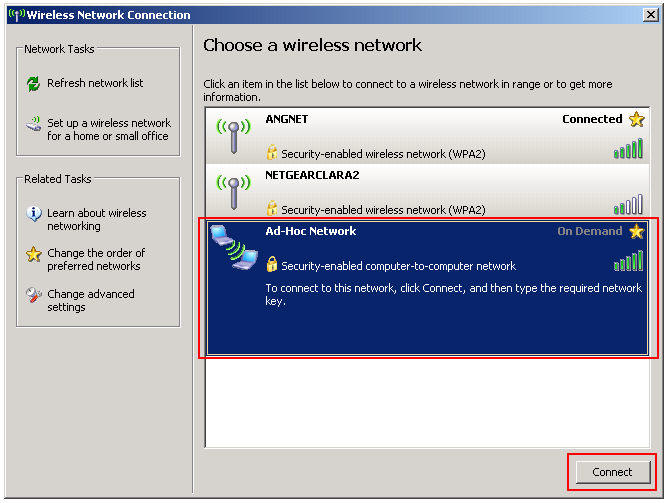
You are now connected to your new Ad Hoc Network! Your computer should have Internet access.
Go back to the Wireless Network Setup to continue the tutorial.
Return from Ad Hoc Network to Set Up Wireless Network
Return from Ad Hoc Network to homepage of Computer Networking Success
"Didn't find what you were looking for? Use this search feature to find it."

1


New! Comments
Have your say about what you just read! Leave a comment in the box below.