Networking Basics - Certifications - Windows 7 - Windows 8 - Home Network Setup - Wireless Setup :: About - Contact - Search
How to Share Printer in Windows XP
To share printer in Windows XP is similar to when sharing a folder. You have two ways to share you printer.
1.) You can use the Network Setup Wizard to automatically turn file and printer sharing on and off. This works only if your computer is not joined to a domain.
To start the Network Setup Wizard:
- Click Start
- Click Control Panel
- The Control Panel window opens, now double-click Network Setup Wizard.
- Follow the instructions in the Network Setup Wizard and it will allow you to configure a new computer name, configure the workgroup name and it will enable file and printer sharing for you. The Windows Firewall will also be configured to allow file and printer sharing on your network for you.
2.) The second way to share printer in Windows XP is by following this step by step:
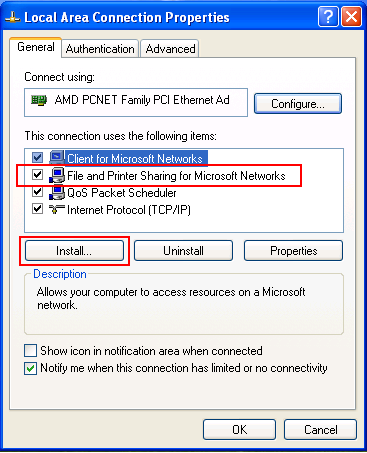
1.) First let's make sure that File and Printer Sharing for Microsoft Networks is installed on your network adapters.
The Local Area Connection Properties window opens.
|
|
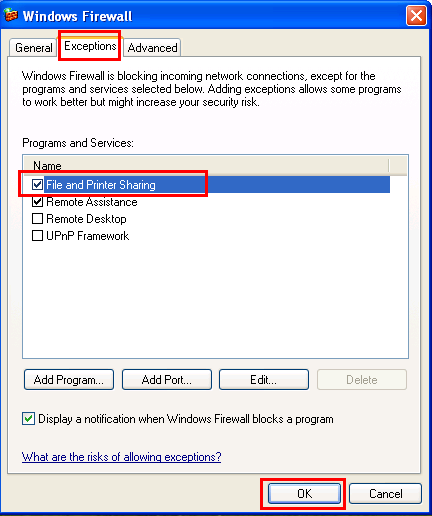
2.) Next, let's make sure that Windows Firewall allows File and Printer Sharing on your computer.
|
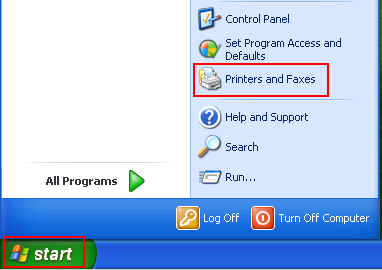
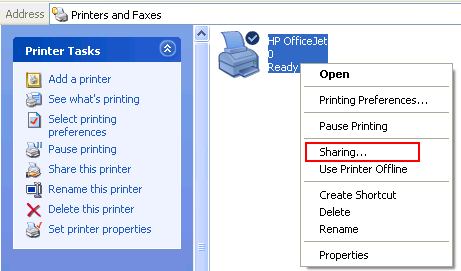
Now let's share your printer!
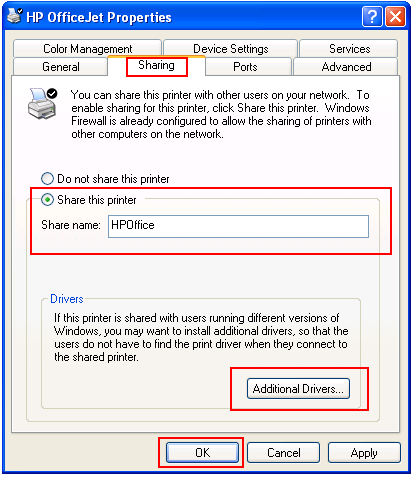
5.) Select the Sharing tab and click Share this printer.
Next to Share name: type in the name of the print share that you want your printer to show when another computer sees the printer on the network. This name will not change the original name of the printer.
I named my print share "HPOffice".
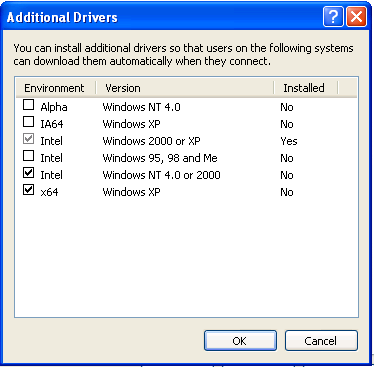
6.) If you click Additional Drivers you will be able to install extra print drivers for other operating systems that are running on your network.
For example: if you have other computers in your home that run Windows XP 64-bit or Windows 2000, then you will have to download the drivers for these operating systems and install them in the Additional Drivers Window
|
7.) In the Additional Drivers window, choose the other operating systems of your other computers on your network which will connect to this printer. When you click OK, you will be prompted to install the drivers. When one of these computers connect to the share of your printer, then the computer will be provided with the correct driver. |
|
Your printer will now have a hand under it ---->>> This is how you can tell if your printer was shared correctly. |
You have a share printer. Now how can you connect to it? Follow this tutorial...
Return from Share Printer to Windows XP Networking Tips
Return from Share Printer to homepage of Computer Networking Success
"Didn't find what you were looking for? Use this search feature to find it."

1



New! Comments
Have your say about what you just read! Leave a comment in the box below.