Networking Basics - Certifications - Windows 7 - Windows 8 - Home Network Setup - Wireless Setup :: About - Contact - Search
Finish setting up your home network by configuring the Windows 7 IP settings.....
1.) Intro >
2.) Network Devices >
3.) Home Network Wiring Cable Modem or DSL Modem>
4.) Home Router Configuration >
5.) Windows Configuration
- Windows XP
- Windows Vista
- Windows 7 (you are here)
- Windows 8
In this tutorial you will learn how to configure Windows 7 IP settings with no difficulty. In any network, for a network device to communicate, they need to have a unique IP address. If two devices or more have the same IP, then they won't be able to communicate properly.
There are basically two types of IP settings that I will show you how to configure on Windows 7:
- Static IP
- Dynamic IP
When do you use a Static IP?
The point of configuring a static IP is so the network device doesn't change IPs. The DHCP server on the network keeps track of which IP addresses are available and which are in use. When you configure a machine with a static IP, then the DHCP server will ping that IP and know that it is in use before handing it out. If a DHCP server is ready to hand a specific IP and does not receive a ping response, then it will hand out that available IP.
What Devices should you configure with Static IP?
Any device on the network which provides a resource like file sharing, printing etc. should have a static IP. Network devices like servers, routers, switches and printers should all have static IP addresses configured to ensure the users can always communicate with them.
What is a Dynamic IP Address?
This type of IP address is called dynamic because it changes when it's lease is up. The DHCP server hands out an IP address and it has a lease to expire. When it expires, the DHCP server will renew the lease or hand out a new IP address. That's why its not a good idea to have your server configured with a dynamic IP, your users will lose connectivity soon when the IP address changes. Imagine having to go around and change all your computer's IP addresses back to the original?
Lets begin the tutorial about Windows 7 IP Settings......
Click here to jump down to the section on configuring "Obtain an IP automatically
How to configure Windows 7 with a static IP?
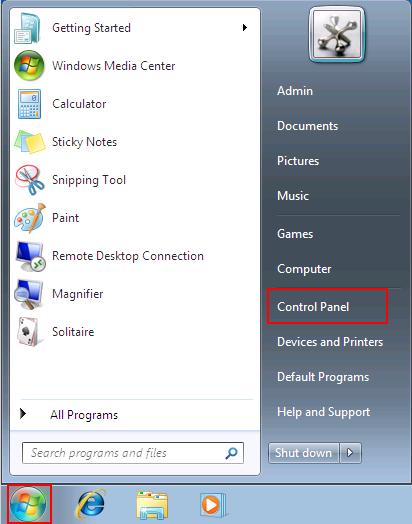
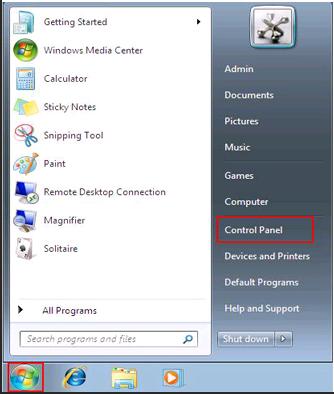
1.) Click the "Start Icon" located on the bottom left corner of the taskbar.
Click "Control Panel".
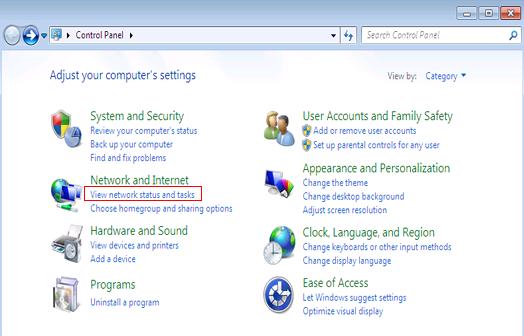
2.) Click "View network status and tasks"
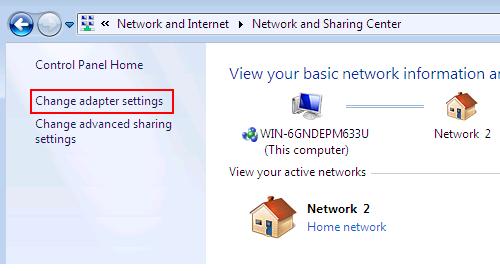
3.) When the "Network and Sharing Center" window appears, click "Change adapter settings".
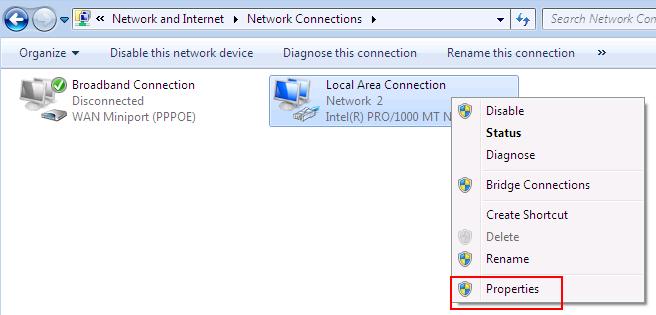
4.) The Network Connections window opens, right-click "Local Area Connection" and click "Properties".
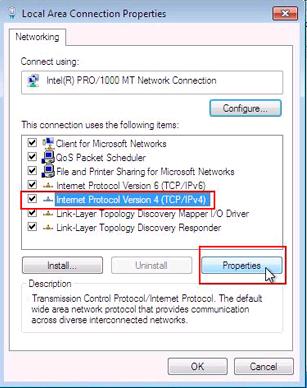
5.) The Local Area Connection Properties window opens, click "Internet Protocol Version 4 (TCP/IPv4)" and click "Properties".
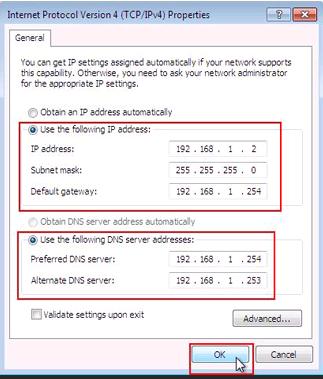
6.) In the next window, click "Use the following IP address:" and now you can type in the IP address, Subnet Mask and Default gateway that you want for this device on your network.
You can now configure the "Preferred DNS server" and "Alternate DNS server".
Remember if you don't want your device to communicate with the Internet or have access outside of your local network, then leave the "Default Gateway" field empty. This would be a great strategy when you have a home server in which you don't want a hacker from the Internet to access it. A little extra security tip : )
Click "OK" in the current window and "OK" again in the next window.
You have now configured this machine with static Windows 7 IP settings. Test your default gateway by pinging it in the command prompt or going to a website. Your default gateway IP address is usually your local router. This can be your home Linksys router or any other router.
How to configure Windows 7 to "Obtain an IP address automatically"
This setting will usually be used for your workstations on your network. It is much easier to use a DHCP server which hands out IPs automatically without any extra effort from you. This is a life saver when you have more than 10 workstations in a given network.
Luckily for us, your home router has the DHCP protocol. Click here to learn how to access your home router or modem to configure DHCP and IP settings for your network.
Lets configure Windows 7 IP Settings to Obtain an IP address automatically.
I will show you a different and faster way to accomplish the same goal as we did earlier. In Windows operating systems you will soon realize that there are many different ways and shortcuts to accomplish the same result.
1.) Click "Start Icon" at the bottom left corner of the Task Bar. Click "Control Panel"
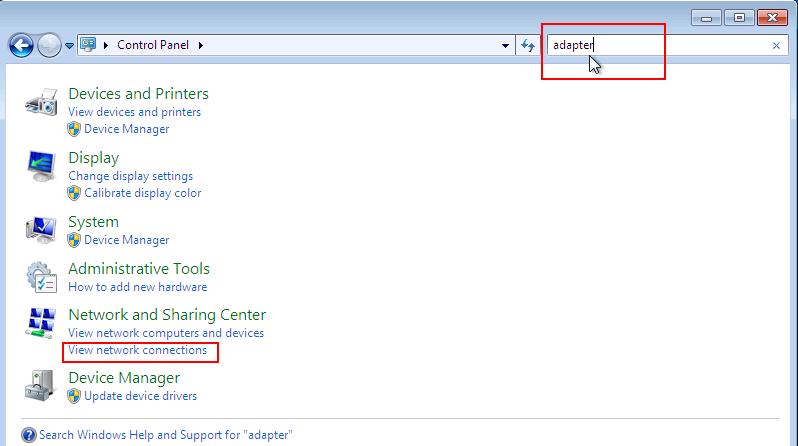
2.) In the Control Panel window you can type "adapter" in the search box to the right.
Click "View network connections"
3.) Right-Click "Local Area Connection" and click "Properties"
4.) In the Local Area Connection Properties, click "Internet Protocol Version 4 (TCP/IPv4)".
Click "Properties"
5.) Ensure that both "Obtain an IP address automatically" and "Obtain DNS Server address automatically" are both selected to ensure when your computer connects to your home router, the DHCP server that runs on the router will automatically assign the IP address settings.
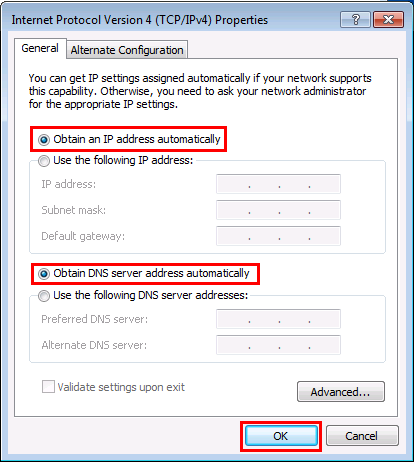
Great job....You Windows 7 is now configured to Obtain an IP address automatically.....
Return from Windows 7 IP Settings to Setting up a Home Network
Return from Windows 7 IP Settings to homepage of Computer Networking Success
"Didn't find what you were looking for? Use this search feature to find it."

1



New! Comments
Have your say about what you just read! Leave a comment in the box below.