Networking Basics - Certifications - Windows 7 - Windows 8 - Home Network Setup - Wireless Setup :: About - Contact - Search
How to Configure Ad Hoc Network
in Windows 8
If you configure ad hoc network in Windows 8 it will allow you to share your home Internet, your files and printers. Only one problem, it seems like Windows 8 is missing the option to create an ad hoc network.
1.) You can use a program like Virtual Router which will allow your PC's built in Wi-Fi card to wirelessly share your Internet with any computer within range. Isn't this basically what an access point would do, you ask? Yes! you are converting your Windows 8 machine into a wireless access point and sharing your Internet connection.
2.) The other option is to configure Windows 8 using Netsh Utility in order to have the ad hoc network option.
An ad hoc network will allow you to connect your computers wirelessly and share you Internet along with your files and printers.
If you don't have a wireless router or access point, allow me to help you convert your Windows 8 machine into a Wi-Fi hotspot.
1.) You can use a program called Virtual Router which will allow your PC's built in Wi-Fi card to wirelessly share your Internet with any computer within range. Isn't this basically what an access point would do, you ask? Yes! you are converting your Windows 8 machine into a wireless access point and sharing your Internet connection.
2.) The other option is to configure Windows 8 using Netsh Utility in order to have the ad hoc network option.
An ad hoc network will allow you to connect your computers wirelessly and share you Internet along with your files and printers.
How to Configure Ad Hoc Network in Windows 8 using Netsh
You probably noticed already that Windows 8 doesn't include an option to create an ad hoc network connection. But we can get around that and use the Windows Netsh Utility to create the ad hoc network.
Using the netsh wlan command, you will be able to use the hosted network (virtualization) feature to create a virtual wireless connection. So if your network interface card (NIC) supports wireless hosted network and virtualization feature, then you will be able to create an ad hoc wireless network and this will turn your computer into a Wi-Fi hotspot.
Let's begin to configure ad hoc network in Windows 8.....
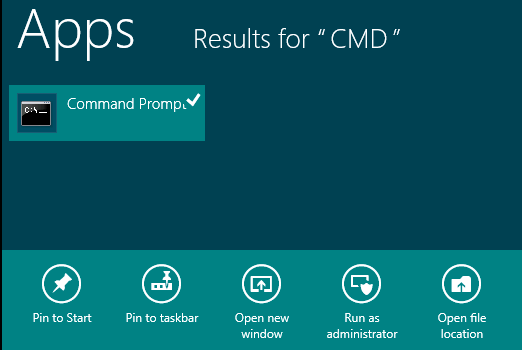
1.) In the Start screen, type cmd
Right-click Command Prompt and click Run as administrator.
2.) The User Account Control prompts you, Do you want to allow the following program to make changes to this computer?
Click Yes

3.) When the Command Prompt opens, you will first need to check if your wireless network interface supports virtualization.
To check this, type netsh wlan show drivers
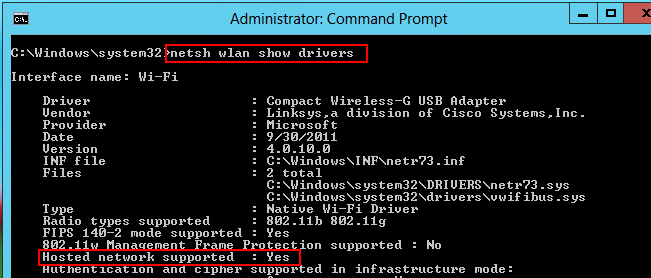
If your wireless network interface shows "no", then you will need to update the driver of your network interface adapter.
If your network interface supports virtualization like mine, then you are ready to configure the new ad hoc network.
4.) Type netsh wlan set hostednetwork mode=allow ssid=<wireless network name> key=<password>
for the ssid = (type the wireless network name of your new ad hoc network)
key = (type the password you want to use for the new ad hoc network)
Below you can see that I chose ad hoc network for my ssid and teksuccess as my password key

This confirms that you have set the ad hoc network to allow
Next you need to start the mode.
5.) Type netsh wlan start hostednetwork

If it says that it couldn't start the network, then you need to disable the interface and then re-enable it.
The driver might need to be installed, so go to Device Manager and refresh the list.
Now that your hosted network is started, we need to enable Internet Connection Sharing on the wireless adapter. This will allow you to share your Internet with other computers using an Ad Hoc Wireless network.
After you configure ad hoc network in Windows 8, you must enable ICS.
How to enable Internet Connection Sharing (ICS) in Windows 8
Internet Connection Sharing (ICS) on the host computer will allow your computers to connect to the Internet.
Use this option if you don't own a wireless router.
1.) Click the "Desktop" window in the lower left corner of the Start screen.

2.) Click the "Windows Explorer" icon in the bottom left corner of the Taskbar. A new window opens.
Right-click "Network" and click "Properties"

3.) The Network and Sharing Center window opens.
Click Change adapter settings

4.) The Network Connections window opens, right-click your wireless adapter and click Properties.
The Wi-Fi connection is my wireless adapter and the Ad Hoc Wi-Fi Network is my newly created Ad Hoc Network. (We used the command prompt and netsh command earlier to create this adapter)

5.) The Wi-Fi Properties window opens, click the Sharing tab.

6.) Select Allow other network users to connect through this computer's Internet connection.
Under Home networking connection:
Choose Ad Hoc Wi-Fi Network(or the name you configured earlier)
Click OK
Your wireless adapter is now configured with Internet Connection Sharing.

An IP address will automatically be assigned to the Ad Hoc Wi-Fi Network adapter.
Check the IP properties to ensure it has an IP address assigned to it.
In the Network Connections window, right click Ad Hoc Wi-Fi Network and click Properties
TheAd Hoc Wi-Fi Network properties window opens, select Internet Protocol Version 4 (TCP/IPv4) and click Properties.
A new window opens and shows an IP address is assigned.

If there is no IP address assigned then run the netsh wlan start hostednetwork command in CMD.
You can now successfully connect to the Ad Hoc Network from other PCs.
Return from Configure Ad Hoc Network in Windows 8 toSet Up Wireless Network
Return from Configure Ad Hoc Network in Windows 8 to homepage of Computer Networking Success
"Didn't find what you were looking for? Use this search feature to find it."

1
Did You Like This Page?
Share This Page
Laptop Repair Video Course Click Below!


 |
 |
 |
 |
 |
Networking Basics - Certifications - Windows 7 - Windows 8 - Home Network Setup - Wireless Setup :: About - Contact - Search
Copyright © 2013 Computer-Networking-Success.com
New! Comments
Have your say about what you just read! Leave a comment in the box below.